
Contents
引言
在Vue项目中,.vue文件是最常见的组件定义方式,它将HTML、CSS和JavaScript整合到一个单一文件中,使开发和维护变得更加方便。然而,浏览器并不能直接理解.vue文件,因此需要将其编译成标准的JavaScript文件,才能在浏览器中运行。本文将深入探讨Vue.js的编译过程,揭示.vue文件是如何被转换为可以在浏览器中执行的JavaScript代码的,从而帮助读者更好地理解和掌握Vue.js的内部工作机制。
<script setup>
import { ref } from 'vue'

const msg = ref('Hello World!')
</script>

<template>
  <h1>{{ msg }}</h1>
  <input v-model="msg" />
</template>
template 编译流程
编译器其实只是一段程序,它用来将“一种语言 A”翻译成“另外一种语言 B”。其中,语言 A 通常叫作源代码source code,语言 B 通常叫作目标代码object code 或 target code。编译器将源代码翻译为目标代码的过程叫作编译compile。
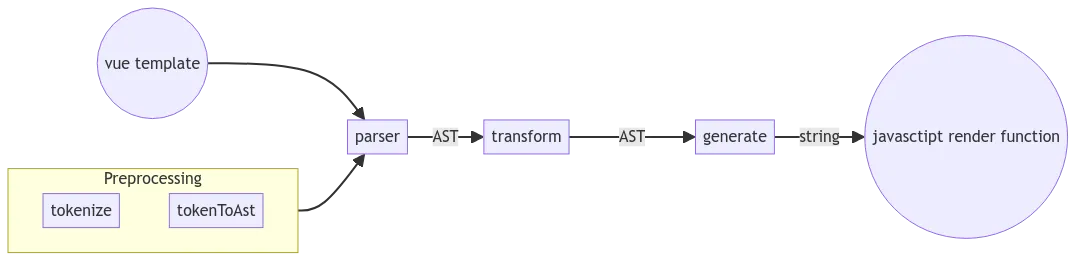
可以看到,Vue.js模板编译器的目标代码其实就是渲染函数。 详细而言,
Vue.js模板编译器会首先对模板进行词法分析和语法分析,得到模板AST。- 接着,将模板
AST转换transform成JavaScript AST。 - 最后,根据
JavaScript AST生成JavaScript代码,即渲染函数代码。
用代码来描述,就是
function compile(template: string): string {

  const tokens = tokenlize(template);
  const htmlAST = tokenToAST(tokens);
  const jsAST = transform(tokens);
  const renderFunctionCode = generate(jsAST);

  return renderFunctionCode;
}
我们这里来实现一个简单的 compile 编译器
parse
tokenlize
举个例子,假设我们有如下模板:
<h1>Hello <span>World</span></h1><h2>hi</h2>
这段模板会被解析为如下的tokens
[
  { type: 'tagOpen', value: 'h1' },
  { type: 'text', value: 'Hello ' },
  { type: 'tagOpen', value: 'span' },
  { type: 'text', value: 'World' },
  { type: 'tagEnd', value: 'span' },
  { type: 'tagEnd', value: 'h1' },
  { type: 'tagOpen', value: 'h2' },
  { type: 'text', value: 'hi' },
  { type: 'tagEnd', value: 'h2' }
]
那么,这是怎么实现的呢?
NOTEFSM(Finite State Machines) 有限状态机,也叫有限状态自动机,是为研究有限内存的计算过程和某些语言类而抽象出的一种计算模型,它拥有有限个数量的状态,每个状态可以迁移到零个或多个状态,输入字串决定执行哪个状态的迁移。
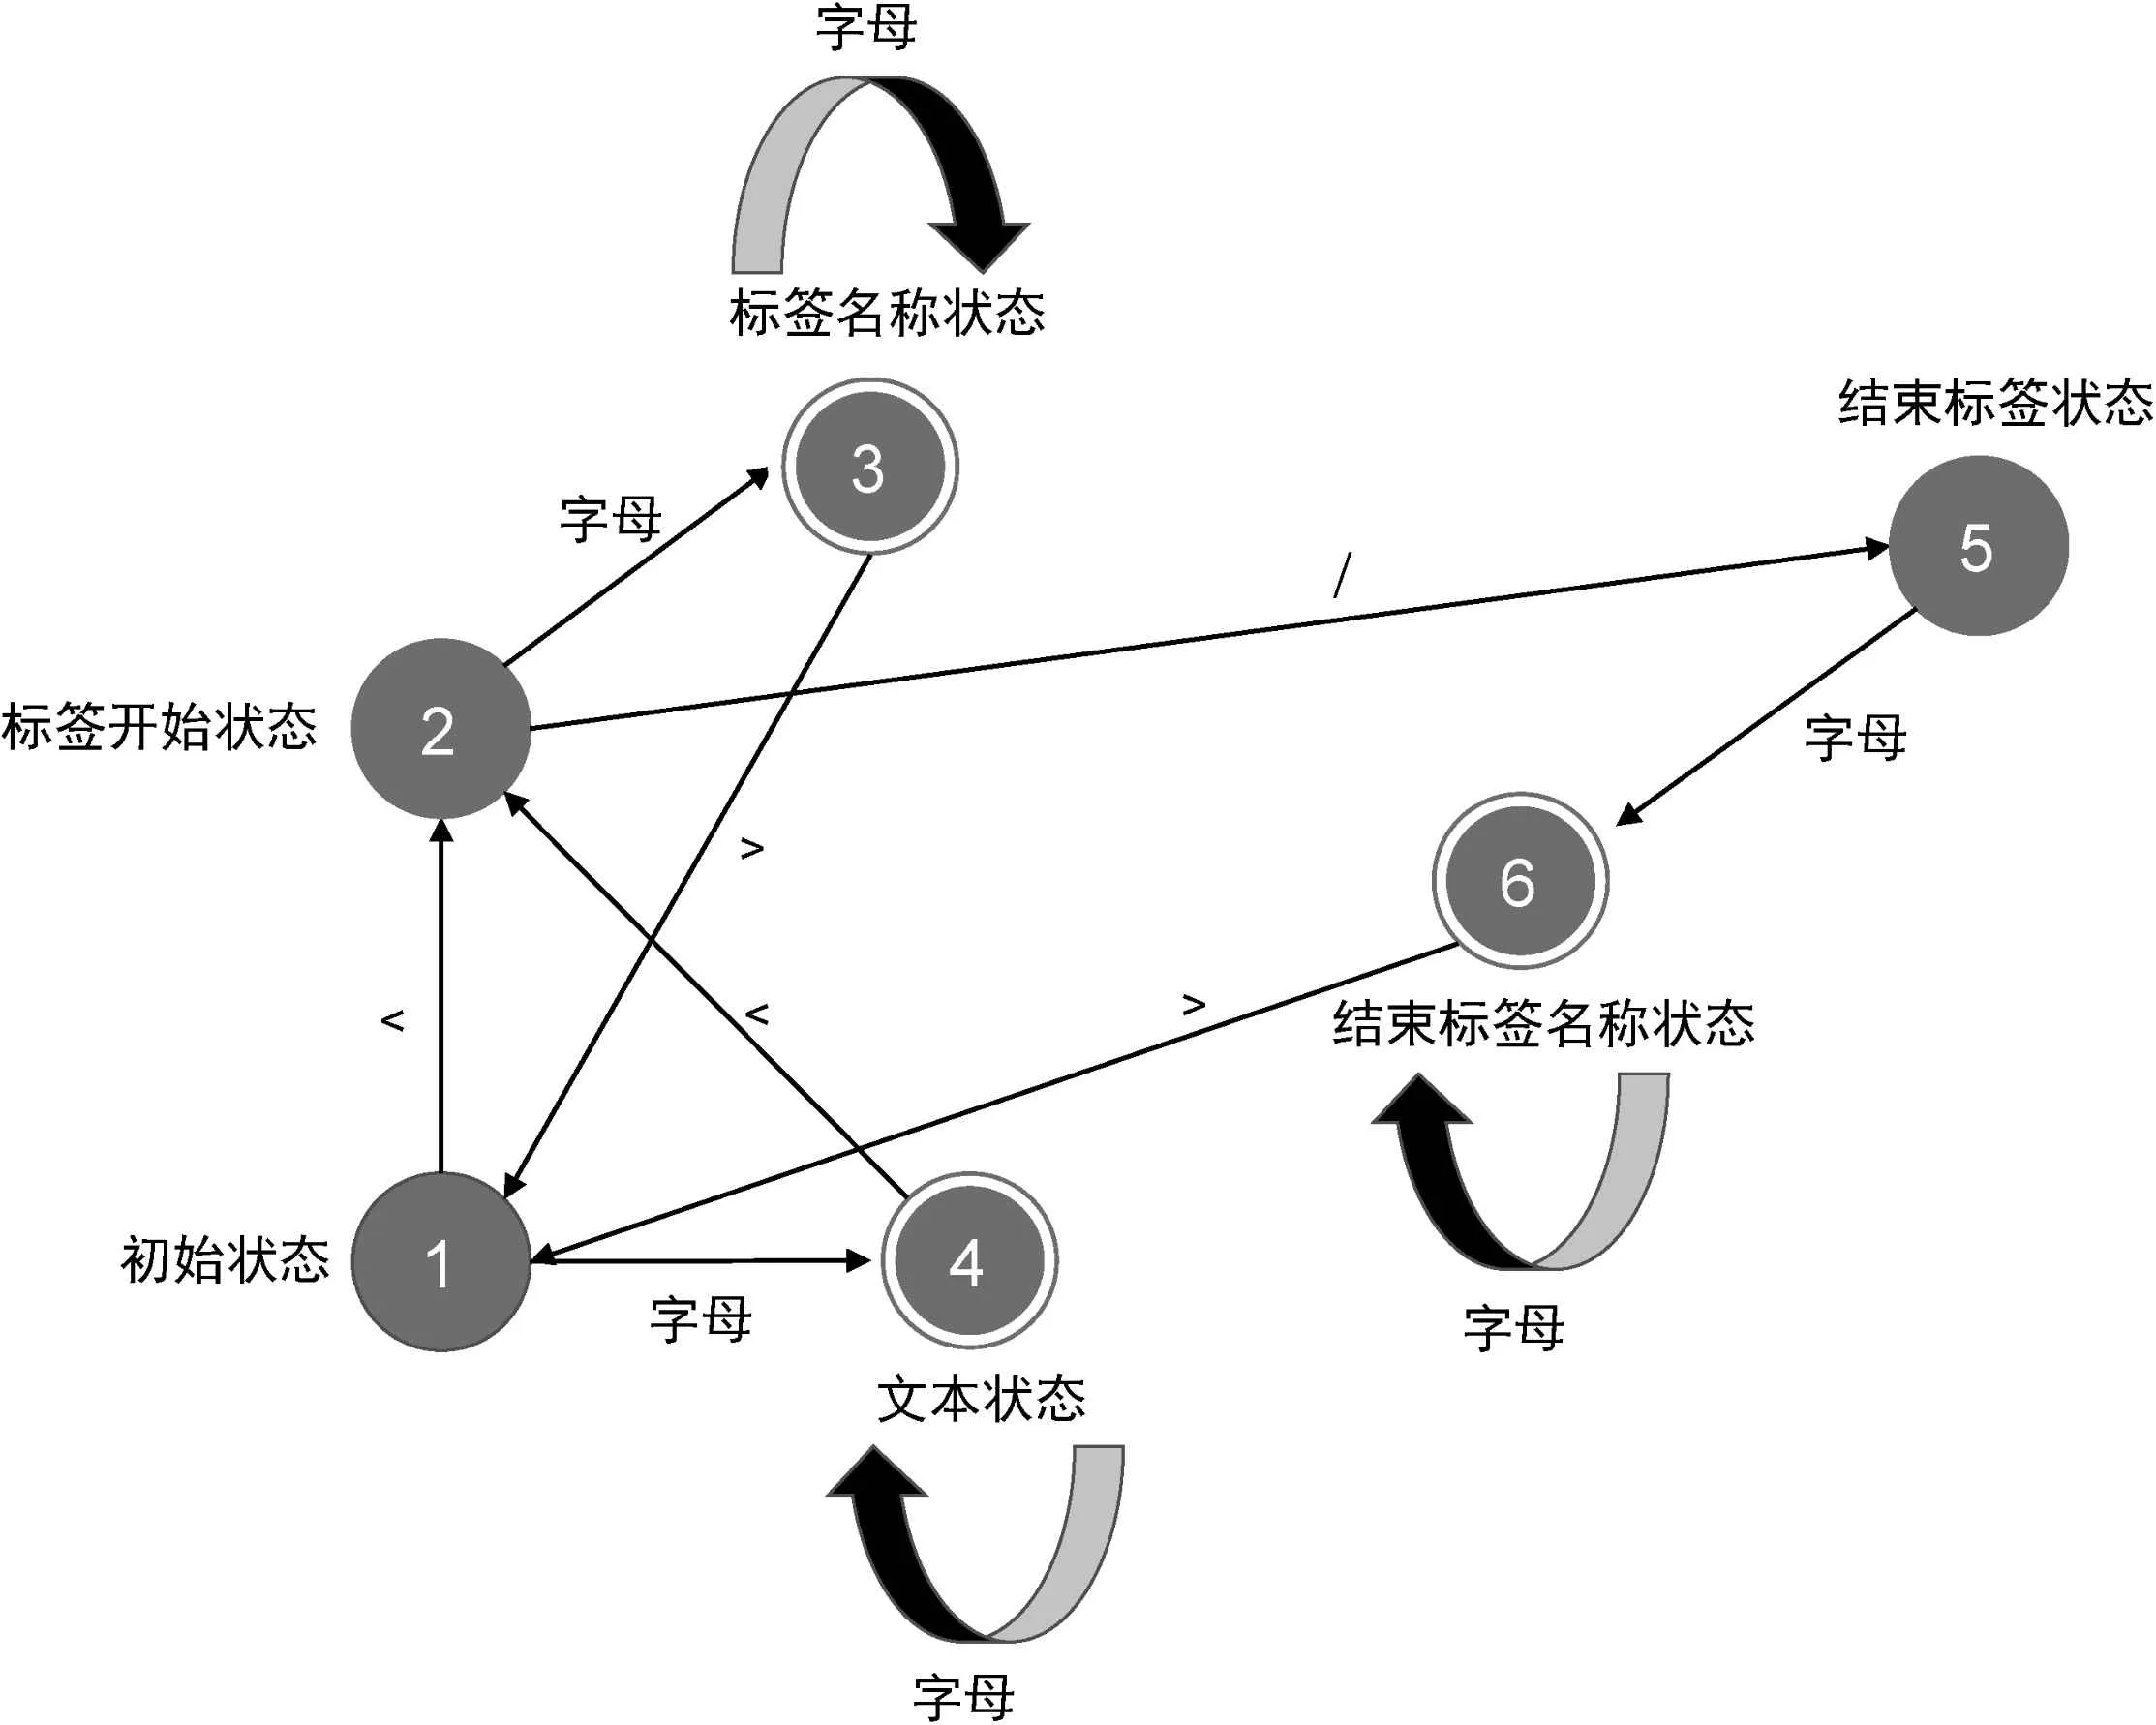
简单说,它有三个特征:
- 状态总数(state)是有限的。
- 任一时刻,只处在一种状态之中。
- 某种条件下,会从一种状态转变(transition)到另一种状态。
我们来实现一下,因为正则解析本质上就是有限状态机,所以这里的实现不涉及正则表达式(仅实现个别状态解析与转换,非HTML语义完整实现)
function tokenizer(code: string) {
  let state: State = State.init;
  let chars: string[] = [];
  const tokens: Token[] = [];
  for (let i = 0; i < code.length; i++) {
    const char = code[i];
    switch (state) {
      case State.init: {
        if (char === "<") {
          state = State.tagOpen;
        } else if (char) {
          state = State.text;
          chars.push(char);
        }
        break;
      }
      case State.tagOpen: {
        if (char === "/") {
          state = State.tagEnd;
        } else if (isAlpha(char)) {
          chars.push(char);
        } else if (char === ">") {
          tokens.push({
            type: state,
            value: chars.join(""),
          });
          chars = [];
          state = State.init;
        }
        break;
      }
      case State.tagEnd: {
        if (isAlpha(char)) {
          chars.push(char);
        } else if (char === ">") {
          tokens.push({
            type: state,
            value: chars.join(""),
          });
          chars = [];
          state = State.init;
        }
        break;
      }
      case State.text: {
        if (char === "<") {
          tokens.push({
            type: "text",
            value: chars.join(""),
          });
          chars = [];
          state = State.tagOpen;
        } else {
          chars.push(char);
        }
        break;
      }
    }
  }
  return tokens;
}

function isAlpha(char: string) {
  const charCode = char.charCodeAt(0);
  return (
    (charCode >= 65 && charCode <= 90) || // Uppercase A-Z
    (charCode >= 97 && charCode <= 122) || // Lowercase a-z
    (charCode >= 48 && charCode <= 57) // Numbers 0-9
  );
}
token to ast
有了token,我们还需将其解析为类似html树结构的AST
function tokenToAst(tokens: Token[]): AstNode {
  const root: AstNode = {
    type: "root",
    children: [],
  };
  const elementStack = [root];
  while (tokens.length) {
    const token = tokens.shift()!;
    if (token.type === State.tagOpen) {
      const currentStack = elementStack[elementStack.length - 1]!;
      const astNode = {
        type: token.value,
        children: [],
      };
      currentStack.children.push(astNode);
      elementStack.push(astNode);
    } else if (token.type === State.tagEnd) {
      elementStack.pop()!;
    } else if (token.type === State.text) {
      const astNode = {
        type: "text",
        children: [],
        value: token.value,
      };
      const currentStack = elementStack[elementStack.length - 1]!;
      currentStack.children.push(astNode);
    }
  }
  return root;
}
输入上述token为参数后,即可获得如下结果。
{
  type: 'root',
  children: [
    {
      type: 'h1',
      children: [
        { type: 'text', children: [], value: 'Hello ' },
        {
          type: 'span',
          children: [ { type: 'text', children: [], value: 'World' } ]
        }
      ]
    },
    {
      type: 'h2',
      children: [ { type: 'text', children: [], value: 'hi' } ]
    }
  ]
}
transform
NOTE本章节施工中
转换的本质就是将描述html内容的AST转换成为描述javascript的渲染函数AST
type Context = {
  parent: AstNode | undefined;
  index: number;
  replaceNode: (node: AstNode) => void;
  patchNode: (node: Partial<AstNode>) => void;
};

type VisitFn = (node: AstNode, ctx: Context) => void;

function transform(ast: AstNode, enterFn: VisitFn, exitFn: VisitFn): AstNode {
  const nodes = [ast];

  const exitFns: (() => void)[] = [];

  const rootContext = makeContext(undefined, 0);

  enterFn(ast, rootContext);

  while (nodes.length) {
    const firstNode = nodes.shift()!;
    firstNode.children.forEach((child, index) => {
      const context = makeContext(firstNode, index);
      enterFn(child, context);
      exitFns.push(() => exitFn(child, context));
      nodes.push(child);
    });
  }
  exitFns.reverse().forEach((fn) => fn());

  exitFn(ast, rootContext);

  return ast;
}

function makeContext(parent: AstNode | undefined, index: number) {
  function replaceNode(node: AstNode) {
    if (parent) {
      parent.children[index] = node;
    }
  }
  function patchNode(node: Partial<AstNode>) {
    if (parent) {
      parent.children[index] = Object.assign(parent.children[index], node);
    }
  }
  const context = {
    parent: parent,
    index,
    replaceNode,
    patchNode,
  };
  return context;
}
generate
生成阶段即为JavaSctipt AST -> 字符串code的过程
function generate(ast: AstJs) {
  function gen(node: AstJs): string {
    switch (node.type) {
      case "ReturnStatement": {
        return handleReturnStatement(node);
      }
      case "FunctionDeclaration": {
        return handleFunctionDeclaration(node);
      }
      case "CallExpression": {
        return handleCallExpression(node);
      }
      case "Literal": {
        return handleLiteral(node);
      }
      default: {
        return "";
      }
    }
  }
  return gen(ast);

  function handleFunctionDeclaration(node: AstJs) {
    return `
    function ${node.name}() {
      ${node.body?.map((innerNode) => gen(innerNode)).join(" ")}
    }
    `;
  }

  function handleReturnStatement(node: AstJs) {
    return `return ${node.body
      ?.map((innerNode) => gen(innerNode))
      .join(" ")}`;
  }

  function handleCallExpression(node: AstJs) {
    return `${node.name}(${node.arguments
      ?.map((innerNode) => gen(innerNode))
      .join(",")})`;
  }

  function handleLiteral(node: AstJs) {
    return `'${node.value}'`;
  }
}